Hope you are staying cool and beating the Texas heat!
After the last Newsletter on the 5 Exercises You Need To Be Doing, I thought it would be helpful to build on that and address two of the most common concerns that come up – balance and Osteoporosis.
If you have questions on these topics, then be sure to check out the articles below. These posts might be review for some of you and a chance to catch up for others.
Also, coming up on July 29, it is the 6 year Anniversary since starting the business! Thank you for joining me on this adventure! I appreciate you taking care of yourself through a regular practice and in turn sharing your best self with those around you and making our community and the world a brighter place!
Wishing you and your loved ones continued excellent health, joy and peace!
Many Blessings to You & Yours,
Shannon
Core Connection for Better Balance
In addition to the Abdominals, what are the other core muscles that contribute to balance? Some of the answers may surprise you. Find out here.
Pilates for Strong Bones
To learn how to build strength down to the bone and even down to a cellular level, then check out this article.
New Years often brings new goals and resolutions, especially in the area of fitness. If you are inspired with the New Year and looking to invest in some bigger pieces of Pilates equipment for home, this newsletter has you covered. Specifically, we’ll focus on Spine Correctors, Baby Arcs and The Pilates Edge.
The pieces of equipment chosen for this issue don’t take up as much room as a reformer or Cadillac/Trapeze Table, but they are more of a financial investment than something like a foam roller or ball. If you have a nook or a workout space carved out, these pieces might help complete it.
Spine Corrector
The Spine Corrector has a special place in my heart as it was my first piece of Pilates Equipment (other than the red Fletcher® towel, of course!) and I still have it to this day. I chose this equipment because it was a great piece for home. Besides the personal benefits, it didn’t take up too much room and could slide into a corner.
For simplicity, we’ll focus on two main points for the Spine Corrector: the arc and the material. The Clara Step Barrel® (named in honor of Mrs. Pilates) has a higher arc and supports more spinal extension. The East Coast and Contour Step Barrel™ have more of an elongated arc shape.
In terms of material, you now have a choice of either the classical wood or foam (like what a foam roller is made out of). The foam or Clara Step Barrel ®Lite version has the advantage of being lighter in weight so it’s easier to lift and/or move around. The Pilates Arc™ variation has the elongated arc and can detach into two usable pieces of equipment.
Baby Arc
Like it sounds, the baby arcs are just the “arc” only portion of a Spine Corrector. The West Coast Style is open without handles and the East Coast Style is closed on the sides and has handles. One of the benefits of the baby arcs is that they fit particularly well under the legs and feet without the possibility of sliding or moving (as can sometime happen with the Spine Corrector).
Pilates Edge
Rather than a curved line, the Pilates Edge is a straight line but at an incline. Though the arc shape naturally lends itself to spinal extension movements, there are still some excellent spinal extension exercises that can be practiced on the Pilates Edge as well. The Pilates Edge supports the spine and core and can be used behind the back or under the legs and feet.
Wishing you and yours a bright, beautiful and healthy New Year! As 2020 brought focus on what is most important and simplicity, may we carry that clear vision into 2021 with hopefully a return to some more “normal” times. Please continue to stay healthy and safe!
In the last newsletter, we had a ball covering toning, fitness and Yamuna® balls. In this issue, we’ll keep it straight and discuss linear rather than round props. Specifically, we’ll focus on Thera-Bands®, the Stretch Out Strap® and Fletcher® towel.
Thera-Bands® offer resistance and can be used to strengthen the upper or lower body, as some of you know from having literally been tied up during a class! 🙂 It is helpful to realize that different manufacturers have different color coding to denote the resistance level, but there does not seem to be a universal color coding system. For example, a “yellow” Thera-Band® from Balanced Body® and OPTP® is the lightest resistance, but from Merrithew® it is regular strength.
Tip: Check the resistance level from the manufacturer to make sure you are getting the right level for you. It should either say light, medium or heavy or have a chart with the resistance levels.
It is helpful to realize the length and width also varies between manufacturers. Some manufactures make the bands 5 ft and others 8 ft long. Some bands are wide and others more narrow. If you want to do foot exercises, you’ll need a wide band to cover the ball of the foot and toes (as pictured at the top).
Thera-Band®:
Sets:
This is a good standard set and commonly used in Physical Therapy. They have a light to regular strength set and then another set with heavy and extra heavy bands. Please note though these bands do contain latex.
If you would like to order just one Thera-Band, you can order a light, medium or heavy from Balanced Body®. The two extra heavy strengths are not available as a regular length band but sold in yards/bulk only.
This is a non-latex, environmentally friendly option! As I’ve mentioned, international shipping can sometimes be an issue as Merrithew® is based in Canada, but these Flex-Bands® are great. The length and width on these bands are a good fit for most exercises. The width on this band covers most feet for foot exercises. Light Regular Strength Extra Strength
Stretch Out Strap®:
The Stretch Out Strap® is similar to the Thera-Band® in that it can be used for upper or lower body exercises, but obviously the strap doesn’t have the elasticity of the band. While there are not different levels of resistance like the Thera-Band®, the strap offers isometric resistance and support. As the Stretch Out Strap® name implies, the strap is great for stretching. Where a band doesn’t necessarily hold the weight of the leg in a hamstring stretch very well, the strap will assist better in such stretches as it offers support without any give.
The loops on the strap are helpful not only with stretching and gauging the right level for you, but also for the grip. For those with arthritis in the hands holding something thin like a band or plain strap may not be ideal. But with the Stretch Out Strap® or similar equipment, hands can slide through the loops. Rather than grasping, an open hand can be used through the loops instead, making upper body strengthening and stretching more accessible.
Special Note: Staying in the Pilates lane and trying to keep the newsletter concise, yoga straps have not been covered. Did want to give them a brief mention though as these straps can be useful in Pilates, Physical Therapy and of course, yoga. Yoga straps can frequently be found in the fitness section of many stores and online at Amazon etc. The Stretch Out Strap® obviously has the loops and yoga straps generally do not. Yoga straps often do have a sort of buckle which could be used to create a loop.
Fletcher Towel®:
Developed by first generation Pilates teacher, Ron Fletcher, the braided design serves a purpose. The braid places the fabric on a slight diagonal, so it has a little give, similar to the Thera-Band®, but as it is fabric, it stops like the Stretch Out Strap®. Before the braid was created, a rolled up towel was used to achieve this effect. Where a Thera-Band® offers different levels of resistance, the Fletcher® Towel meets the students where they are at. Whatever strength the student has to pull on the towel, that is the resistance he or she will get out of it. As students get stronger, the Fletcher® towel continues to match their strength. In addition, as the Fletcher® Towel is thicker, this makes it a little easier to grasp than a Thera-Band® or Stretch Out Strap®. Most people think the red Fletcher® towel is just a cute accessory, like a scarf, but the stylish braid actually has a function.
Hope this article helps you “keep it all straight” between the various Thera-Bands®, straps and even towels out there. Most of all, hope you continue to be centered and strong.
Keep Calm and Stay Aligned,
Shannon
As a reminder, this series is concentrated on equipment pieces that are accessible for home both financially and physically (easily fit into a small space). Since Pilates and other reputable manufacturers’ may not be as commonly known, this series will direct you to recognized names in the industry, but similar products may be found on Amazon or through other retailers. This is not an endorsement of any particular company or product.
In Part 1 of this series, we covered how to choose the right mat for your body and your space. Continuing with Part 2, we are going to focus on some of the most requested and popular pieces of equipment for home, specifically, the Foam Roller and the SmartSpine.
The Foam Roller is hands down the most requested piece of home equipment. I get asked about the roller more than any other item. You might be surprised at the great variety of rollers to choose from, including one that can act similar to a Reformer!
The SmartSpine is also a frequently requested item. Though more of an investment than a Foam Roller, many students love the SmartSpine. This is the type of item that students put on their Holiday wish list and let family members know about it!
Though the Foam Roller and SmartSpine can be used in a variety of ways, such as seated or even standing, one of the main ways they are used is to align the spine while lying down. With the Foam Roller, the vertebrae are directly on the roller although there are some recent variations where the spine goes between two connected rollers. This more recent innovation on the Foam Roller is similar to the SmartSpine where the vertebrae rest in a groove and the equipment provides columns along each side of the spine.
With the SmartSpine, one of the wonderful benefits is that it can be heated, further facilitating the release of the spinal muscles and finding the core connection. Both the Foam Roller and the SmartSpine are used to release muscles, not only in the spine but also in other ways, such as releasing the Iliotibial (IT) Band on the roller.
The Foam Roller and the SmartSpine obviously present a challenge to balance even when lying down. Remaining balanced on either piece of equipment can bring to light imbalances in the spine or core, especially when a leg or arm is lifted. These pieces of equipment can stimulate and realign the spine while reawakening the core.
As a reminder, this series is concentrated on pieces that are accessible for home both financially and physically (easily fit into a small space). While there are other Pilates pieces that help with spinal alignment, some of which we’ll cover later in the series, the Foam Roller and SmartSpine are very home friendly.
Since Pilates and other reputable manufacturers’ may not be as commonly known, this series will direct you to recognized names in the industry, but similar products may be found on Amazon or through other retailers. This is not an endorsement of any particular company or product.
Foam Rollers:
The Foam Roller was not invented by Joseph Pilates but was actually developed by Moshe Feldenkrais. To learn more about how the Foam Roller made its’ way into the Pilates world and about the difference between rolling on foam versus a ball, click here to read a previous article on this topic.
There are a variety of Foam Rollers. There are rollers that are cut in half so that they have a flat, stable side and actually do not roll. There are short rollers that can be used for the feet. There are rollers that have knobs and grooves to dig in and release muscles. The list below is hardly exhaustive.
Tip: In order to insure that you get a Foam Roller long enough that you can rest your spine on it, look for 36 inches long. Also, look for full round (unless you want one split in half for more stability). Generally, the size you want to look for is 6” x 36”.
Foam Rollers come in 3 types of densities: hard, medium and soft. Most of you are probably familiar with the medium and some the firm Foam Rollers as these are the most common types of rollers in gyms and studios.
Hard: If you see terms like “high density” or “extra firm”, these are hard, durable foam rollers.
Medium: The medium density Foam Roller offers plenty of firmness and is more of a regular roller – not too hard or too soft.
Soft: What may not be as familiar is the soft version. Developed in more recent years, it offers the benefits of the original Foam Roller (spinal alignment, opening the chest…) but in a more gentle way. If you have arthritis or achy joints, you may really appreciate the soft variation.
Reform Roller!
Called MOTR® (Movement On The Roller), this device is like a Foam Roller and Reformer combined. Rather than foam it is a plastic tube with branches at the top where straps come out offering different levels of resistance. The branches and straps can be stored in the tube itself. Obviously, the MOTR® is more expensive than a Foam Roller (by roughly $300 dollars) but if you are missing the reformer and do not want to make an investment of thousands, this may be an alternative. The MOTR® also does not require much space and can be easily stored away, unlike a reformer.
SmartSpine:
The SmartSpine was developed by Marie-Jose Blom. It is designed with two grain filled columns that run along each side of the spine. The vertebrae rest in the groove between the two columns. The SmartSpine can be heated, helping the muscles that run along the spine to relax and the fascia covering these muscles to release. This release in back aids the abdominals in contracting more readily in front.
The SmartSpine fits the length of the spine and only comes in one size. The only variation is that there is a regular and lavender fragrance. If you have allergies, the unscented might be a better fit for you. If you do not have any allergies or sensitivities, the lavender can add to the relaxing element of the SmartSpine.
This may sound too good to be true, but this edition of the newsletter is going to tackle how to pose to the most optimal advantage in photos. Whether for summertime vacation or for a family or school reunion, there are a few things you can do to help present your best self when those special moments are captured for years to come.
It probably won’t surprise you to learn, especially as this a Pilates newsletter, that one of the most basic things you can do to look thinner instantly is to stand up straight! Posture is key. If the spine and upper back are rounded and hunched forward, it’s not only bad posture but that posture can also makes the abdominals stick out! As soon as the spine is lengthened upward, there is more space for the internal organs and the tummy starts to come in.
With slumped posture, there is often a forward head. In Pilates and in Physical Therapy, a common exercise is to retract the head back. Since the head is usually so far forward, this exercise exaggerates in pulling the head back the other way into retraction. While this may be a good exercise to help correct posture, it is probably not a position you want to be in for pictures as it usually creates a double chin!
For good posture, focus on the length of the spine upward through the crown of the head, rather than thrusting the shoulders back into a rigid military posture or jamming the head back into a double chin. In addition to good upright posture, there is something else you can do to position yourself to appear slimmer in pictures. This comes from the dance world but if you pay attention, you will notice that models and actresses on the red carpet do something similar as well.
You may be familiar with the positions of the feet in ballet and perhaps the arms, but you may not realize there are eight positions of the body as well. Of the ballet body positions, there is one in particular we are going to focus on as it relates to our topic of how to strike a pose for pictures. The position is croisé devant (krwah-ZAY duh-VANH). It is French for “crossed in front.” The dancer rather than facing straight front or side is slightly angled to one corner and one leg (the leg closest to the audience) is stretched out or crossed in front.
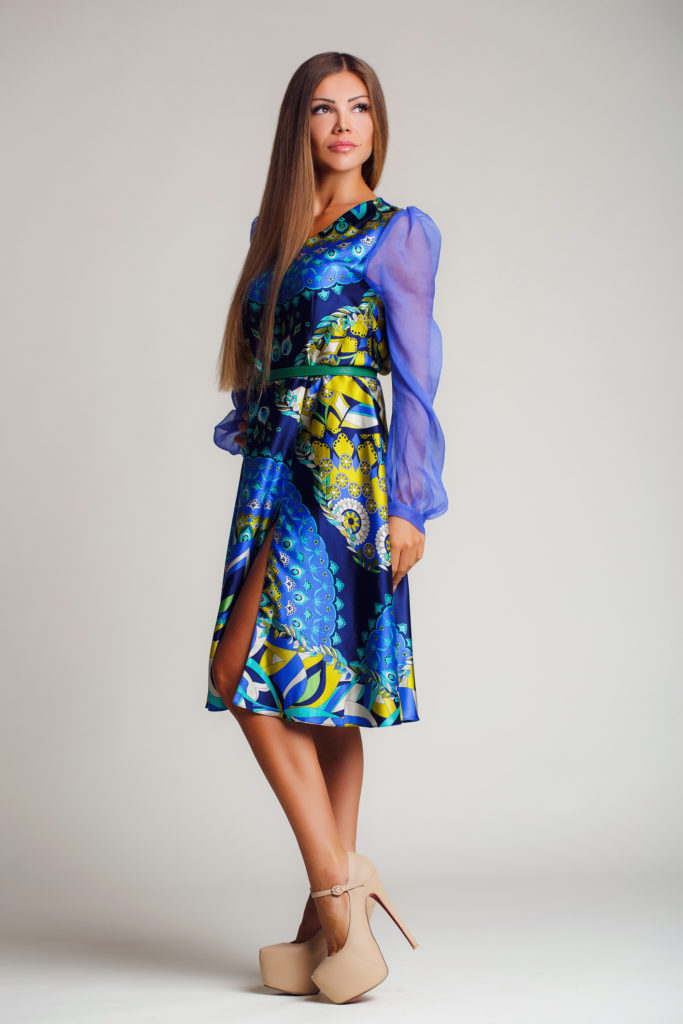
This position has a slimming effect as the body is angled rather than straight forward. It’s not uncommon to see stars posing with their lower body slightly angled and bending the front knee a little (as seen in the photo at the top of the newsletter). This angled position slims the appearance of the hips. In addition, models frequently turn their torso straight toward the camera, so there lower body is at angle but not their upper body. This has the added effect of also slimming the waistline.
So next time you are at a special event, occasion or gathering and it’s time to take a picture, remember to stand tall, turn the lower body on a slight angle but the upper body square toward the camera to have the most flattering angle. Most of all, if you are feeling good both from the special occasion as well as because you have been caring for yourself through proper exercise and nutrition, your sense of well being and personal special essence is going to shine through.