Hip Flexor Edition

Pictured above is an important hip flexor called the Psoas Major.

Our topic of study for this school year is well known muscles groups.  Last month, we looked at the hamstrings, examining the different muscles that compose the group and how these muscles act on the back of the leg and even the posture.  If you missed it, you can catch up here.

This month we are going to focus on another group of muscles that also gets attention, the hip flexors.  There are multiple muscles that make up the hip flexor group.  They are the Tensor Fascia Lata (TFL), Rectus Femoris, Satorius and the Iliopsoas.  Even the adductors (a whole other group of muscles on the inner thigh requiring a discussion for another time) have the potential to assist in hip flexion.

Of the hip flexor group, three of the muscles start on the front of the hip bone.  They are the TFL, the Rectus Femoris and Satorius.  As they attach to the front of the hip bone, these muscles can only flex or bring the leg to 90 degrees.  They obviously cannot pull the leg higher than hip bone level as that is where these muscles begin.

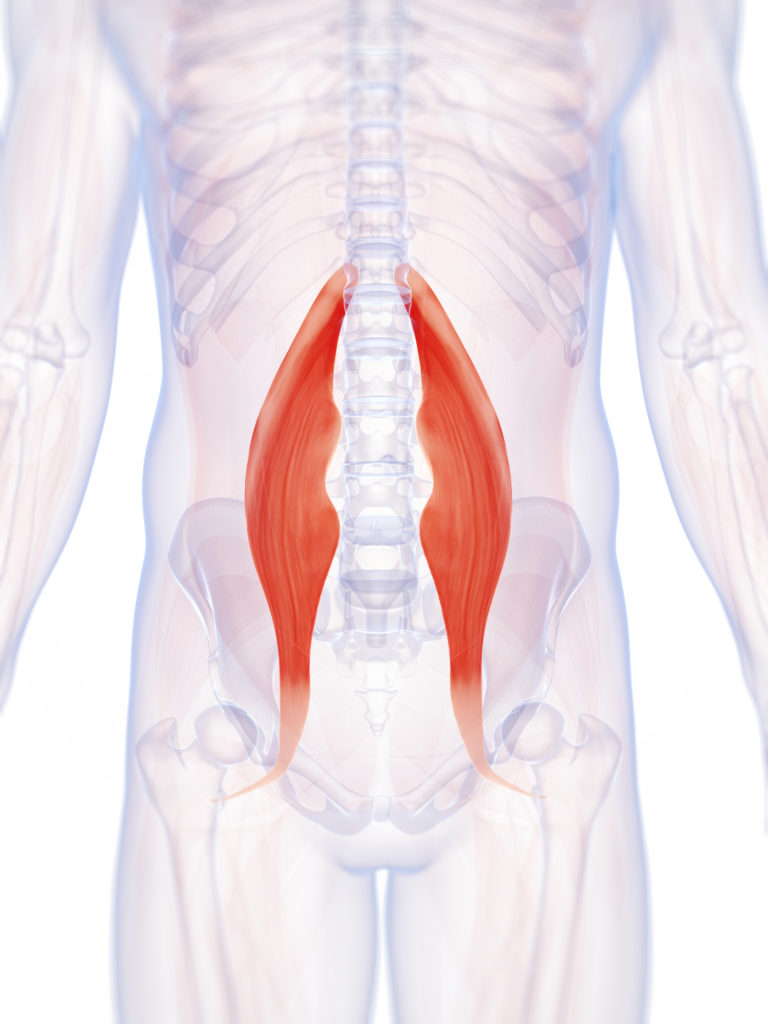
Which leads to the iliopsoas, the hip flexor muscle I particularly want to highlight.  The iliopsoas is composed of the psoas major, psoas minor and the iliacus.  Interesting to note that not everybody has a psoas minor.  The psoas major and minor have the same function so for those without a psoas minor they may never know it.

The psoas major starts deep in low back at the (lumbar) spine and runs across the front of the hip bone and attaches onto the leg (femur).  The iliacus starts inside the hip bone and then runs along with the psoas to attach at the same spot on the leg bone.  

As it has a higher starting point, the psoas major can bring the leg into hip flexion past 90 degrees.  Because the psoas attaches on the spine, it not only effects the hip and leg but also has an impact on the lower back.  If the psoas is tight, this can pull the lower back forward creating an arch.

Discussing the hip flexors so far we have focused on lifting or flexing the leg toward the torso.  It is important to mention that the psoas can flex or bring the trunk toward the legs as in a full sit up or roll up.  

The term hamstrings and hip flexors are something that you may hear a lot in Pilates and beyond.  I trust the break down of these muscle groups and how they act on the legs, hips and spine has been insightful.  Next time you hear one of these terms, hopefully you will have greater appreciation for the beauty and complexity of the human body and all it does for you on a daily basis without even thinking about it.

Anatomy 201

Last September the newsletter kicked off with Anatomy 101.  For back to school, we are going to revisit this topic with Anatomy 201.  Our theme for the year is going to be muscle groups.  Each month we will focus on a different “popular” muscle group.  This month we are going to cover the hamstrings.  

It is important to note about muscle groups, the hamstrings being a good example, that they are actually – a group of muscles.  That may sound obvious but because the group name is often referred to, it can sound like it is one muscle.  The general term (hamstrings) refers to multiple muscles that comprise a group.  

There are three muscles in the back of thigh that make up the hamstrings.  The three muscles that compose the hamstrings group are the biceps femoris, the semitendinosus and semimembranosus.  

The hamstrings, all three of them, begin or have what is called their origin on the sitz bone.  If you sit and put a hand underneath one hip, the bone you feel or sit on…is the sitz bone.  If you practice Yamuna® Body Rolling (YBR), the sitz bone is the point that is used to begin the hamstring routine.  It is also a good place to learn some of the principles of YBR as the sitz bone is one of the easier bony landmarks to find.

The biceps femoris is lateral or toward the outside of the back of the leg.  It begins on the sitz bone runs along the back, outside of the leg.  This muscle attaches below the knee at what is called the insertion.  If you sit and bend your knee and strum your fingers along the outside edge of the back of the knee, you can feel the biceps femoris tendon as it makes its’ way to attach below the knee.

Similarly, the semitendinosus and semimembranosus are medial or run more along the inside of the back of the leg.  They too attach below the knee.  If you sit with your knee bent and strum along the inside back of the knee, you can feel these two tendons as they run along the back of the knee.

As the hamstrings group start at the sitz bone and run behind and attach below the knee, you can see the obvious action of the hamstrings is to bend or flex the knee.  They also extend or bring the leg back at the hip joint.  What may not be as obvious is how these muscles impact posture.  Tight hamstrings pull on the sitz bone which pulls the pelvis down causing more of a tuck and a flat lower back posture.  

Of course, tight hamstrings can make it difficult for students to sit on the floor with straight legs while keeping the back straight or when standing to reach down and touch the toes.  People with tight hamstrings may try to make up for it by over rounding in their back.  

All three of the muscles that comprise the hamstrings group, run from the back of the hip to the back of the knee.  They impact not only knee movement but also pelvic movement and posture.  

Hamstrings is a word that is often referred to but not as often given much of a detailed description.  I hope defining the hamstrings has given you some clarity and insights.  Please stay tuned for the continued examination into muscle groups in the next newsletter as we explore the hip flexors.

No Pain, No Gain?

This is a famous mantra in the fitness world and beyond.  In this edition of the newsletter, we are going to look at this concept more closely.  While there is truth to it, this principle can also be taken to extremes that are harmful and result in losses rather than gains.

It is established that the body grows stronger as it is challenged – whether by increasing weights or increasing time on cardio activities etc.  In sports fitness, this concept is used to keep athletes improving. 

That said, a fine tuned athletes point of challenge is different than the coach potato working out for the first time.  If the novice tries to do the same workout at the same level he hears a famous sports figure is doing, it won’t be long until there is pain or injury and the coach potato is back on the sofa.

Even a person who is consistent with working out can develop pain from practicing with improper form.  In Pilates, having good alignment is huge, but good training in other modalities will also emphasize proper form as well.  With Pilates, quality is often emphasized over quantity.  Better to do a few good repetitions of an exercise and strengthen the underused muscles than to do many repetitions with bad form and continue to strain/overtrain the over developed areas.

With fitness, as in life, there is effort and challenge that brings growth.  However, it’s really the use of the word “pain” in the “No Pain, No Gain” mantra that is misleading.  While it is catchy and rhymes, technically real pain is generally not a good thing.  

There are times you may have to work through pain, but that is not the goal.  If you are in pain all the time and the pain increases with working out or certain motions/activities, you don’t want to ignore it.  Pain is the body’s warning signal, a red light that there is something wrong.  Continuing to work through pain when your body is telling you to stop, is ultimately going to end up with loss (an injury, lost time at work, loss in mobility and function) and not gain.

Listen to what your body is telling you.  Don’t ignore the body’s signals like pain.  Seek the appropriate professional help where needed – whether a family doctor or a specialist.  Follow their recommendations.  And when it comes to fitness, rather than thinking “No Pain, No Gain”, instead consider another mantra “Work smarter, not harder”.  

How To Look Thinner Instantly!


This may sound too good to be true, but this edition of the newsletter is going to tackle how to pose to the most optimal advantage in photos. Whether for summertime vacation or for a family or school reunion, there are a few things you can do to help present your best self when those special moments are captured for years to come. 


It probably won’t surprise you to learn, especially as this a Pilates newsletter, that one of the most basic things you can do to look thinner instantly is to stand up straight! Posture is key. If the spine and upper back are rounded and hunched forward, it’s not only bad posture but that posture can also makes the abdominals stick out! As soon as the spine is lengthened upward, there is more space for the internal organs and the tummy starts to come in.  


With slumped posture, there is often a forward head. In Pilates and in Physical Therapy, a common exercise is to retract the head back. Since the head is usually so far forward, this exercise exaggerates in pulling the head back the other way into retraction. While this may be a good exercise to help correct posture, it is probably not a position you want to be in for pictures as it usually creates a double chin!  


For good posture, focus on the length of the spine upward through the crown of the head, rather than thrusting the shoulders back into a rigid military posture or jamming the head back into a double chin. 
In addition to good upright posture, there is something else you can do to position yourself to appear slimmer in pictures. This comes from the dance world but if you pay attention, you will notice that models and actresses on the red carpet do something similar as well. 


You may be familiar with the positions of the feet in ballet and perhaps the arms, but you may not realize there are eight positions of the body as well. Of the ballet body positions, there is one in particular we are going to focus on as it relates to our topic of how to strike a pose for pictures. The position is croisé devant (krwah-ZAY duh-VANH). It is French for “crossed in front.” The dancer rather than facing straight front or side is slightly angled to one corner and one leg (the leg closest to the audience) is stretched out or crossed in front. 


This position has a slimming effect as the body is angled rather than straight forward. It’s not uncommon to see stars posing with their lower body slightly angled and bending the front knee a little (as seen in the photo at the top of the newsletter). This angled position slims the appearance of the hips. In addition, models frequently turn their torso straight toward the camera, so there lower body is at angle but not their upper body. This has the added effect of also slimming the waistline. 


So next time you are at a special event, occasion or gathering and it’s time to take a picture, remember to stand tall, turn the lower body on a slight angle but the upper body square toward the camera to have the most flattering angle. Most of all, if you are feeling good both from the special occasion as well as because you have been caring for yourself through proper exercise and nutrition, your sense of well being and personal special essence is going to shine through. 

Studio Anniversary


Three Years!

Dear Students,

The studio Birthday is coming up soon. I can
hardly believe it has been three years! The time has certainly flown by. It has been a delight
and a privilege to watch and to facilitate each
of you on your Pilates and health journey.

In addition to offering private sessions, the studio started a free educational bimonthly newsletter this last year. If that is something you would like to receive, you can sign-up here as well as catch up on past issues posted here on the blog.

 Thank you for your dedication not only to the studio but also in your commitment to self-care through a regular Pilates practice. As you care for yourself, you are better able to serve the ones you love and the greater community. I appreciate you and I’m grateful to be a part of your life and wellness team. 

Wishing you continued joy and vibrant health!


Sincerely,

Shannon

Freedom Of Movement


Since Independence Day is tomorrow, it seems an appropriate time to consider the topic of freedom in movement.  What does freedom of movement mean?  Well, it can actually have different definitions and layers depending on perspective.

To begin, let’s go deep to the level of the joint, where two bones connect together.  If the muscles around the joint aren’t being used evenly, this will create an imbalance in muscular development at that joint.  This happens with repetitive and postural patterns.  If there is an imbalance, this is going to ultimately cause some loss in ability to move freely or optimally at the joint as one side will be overworking and the other side underworking.  

This is one of the powerful principles of Pilates as it helps to balance muscular development. The overworked area begins to stretch and let go while the underutilized region starts to strengthen.  The Pilates principle of balanced muscular development was address in this earlier newsletter.  

One of the other key Pilates principles is Control.  In fact, Joseph Pilates called his method “Contrology”.  It’s interesting to note that while Pilates helps students gain freedom of movement as they balance their muscular development, it is done with control.  During a Pilates class, performing the exercises may not seem like freedom of movement such as in a freestyle or improv dance class where movement is creative and abandoned, but ironically it is the control (moving slowly, training in new patterns) that is ultimately going liberate students from already ingrained patterns.  Thus empowering students to continue to move optimally for years to come.  

On a broader level, freedom of movement relates to quality of life.  Whether being able to get up and down from a chair or the floor or expanding your spinal mechanics to improve your golf game, maintaining as much freedom of movement as possible is an important goal.  As the country celebrates it’s freedom, may you too continue to enjoy freedom of movement of all your joints and quality of life for years to come.

Pilates On Vacation


Part 3: Equipment For The Road

This is the conclusion of the “Pilates On Vacation” series. The first installment showed how to find a teacher while traveling locally or abroad. The second part taught things to look for and questions to ask when researching a new teacher and/or studio. If you can’t find a teacher or studio where you are going, then this last segment is going to touch on equipment that is travel friendly and some additional resources that can help you continue your Pilates practice.


One of the many advantages with Pilates is that there is mat work which obviously doesn’t involve equipment at all. You don’t even have to have a mat. If you have enough room, you can get down on the floor (or place a towel on the floor as a mat). For students with mobility issues, you could even stay in bed rather than get down on the floor.


When it comes to equipment, a theraband is easy to take on the road. It offers resistance but is light (unlike packing hand or leg weights). A theraband doesn’t take up much room and can easily slip into a suitcase or bag. 


Another option is a Fletcher® towel. This is also light and flexible so it could be adapted while packing. The bulk would be like adding another piece of clothing. Rather than having a preset resistance like a theraband the towel doesn’t have much give. The Fletcher® towel meets students where they are at and offers continued appropriate resistance as they get stronger.


Yamuna® balls are also excellent for traveling.  The Yamuna® balls (with the exception of the small black, clear sea and blue ones), deflate and reinflate. This makes the balls easy and light to pack. Though Yamuna® is technically not Pilates and is a modality of it’s own, in terms of equipment that is travel friendly, it is worth mentioning.


Lastly, if you weren’t able to find a teacher at your vacation destination, there are a number of videos and subscriptions that offer classes. Though this is not ideal for beginning your Pilates journey, if you have had instruction in the method and your goal is fitness (no series health issues, injuries or special needs etc.) then this is a great supplemental option. 


There are several subscription options available but the main one is Pilates Anytime (for those that like Yoga there is also a Yoga Anytime spinoff). Pilates Anytime has thousands of videos with a variety of levels, styles and master teachers to choose from. They generally have a free 15 day trial, so vacation might be the perfect time for you to test it out.


This series has addressed a number of topics that should make it easy for you to stay in shape over the summer. From where to find qualified teachers and what to ask them to what equipment to pack if your journeys take to more exotic locales, you are covered so you can stay strong and feeling your best wherever the road leads you.

Pilates On Vacation


Part 2: Questions You Should Ask

The last newsletter shared resources for finding a Pilates teacher while traveling over the summer.  Continuing our three part series “Pilates on Vacation”, this edition is going to focus on questions you should ask when you find teachers or studios in the locale where you will be visiting.  

  • How do you know if the teacher is qualified?  

 Since a Manhattan Federal court ruled in 2000 that Pilates is a generic term (like karate or yoga), it has opened up the door for anyone to say that they teach Pilates.  Even if someone has only had a weekend of training (or less), she could be using the name “Pilates” in advertising to an unwitting public.  A qualified teacher will have an appropriate education in the Pilates method.  A training program would be at least 6 months and generally they are 1-2 years.  A minimum of 450 hours is required in order to sit for the Pilates Method Alliance® exam, the only third party certification in the industry.         

If you found the teacher through the PMA as recommended in the last newsletter, then you know they have at least met the minimum requirement for training.       

  • What should you look for in a teacher or studio?

Consider education and experience as you research a new teacher or studio.  Since the Pilates Method Alliance® came out with the certification exam in 2005, it is possible to find an experienced teacher of 20-30 years who may not have taken the exam.  One teacher could be young, properly educated and certified but may not have much experience.  Another teacher could have apprenticed many years ago before the PMA exam was available and have lots of experience but not technically be certified.  So look for education and experience in a teacher and also factor in your needs (fitness or therapeutic) to find the best fit.
     

To summarize, here is a short list of questions you want to ask, especially if this information isn’t advertised elsewhere (online in a bio or in a brochure):

  1. Where did they receive their training?  
  2. How long was the program?  
  3. Are they PMA certified? 
  4. How long have they been teaching since graduation?  
  5. If you have special needs, how much experience do they have with your condition?


Once you have found a qualified teacher in your vacation destination who meets your needs, you are going to be in good shape to stay fit over vacation.  If you can’t find a qualified teacher in your vacation spot, there are some tools you can use to still maintain your practice.  The next newsletter will cover equipment that is easy to take on vacation as well as some additional options to help you stay consistent with Pilates through the summer.


Pilates On Vacation


Part 1: Where To Find A Teacher

With summer around the corner, the next three newsletters are going to focus on ways to stay in shape over summer vacation. To begin, this issue shares resources for finding a Pilates teacher while traveling, nationally or internationally. If you plan to spend time in one location, this is an excellent option to explore. 


The first resource to investigate is the Pilates Method Alliance. The PMA is a professional Pilates Teacher association. They hired Castle Worldwide to create the only third party certification for Pilates teachers. The requirement to sit for the exam is a minimum of 450 hours of training.  If you look for a PMA Certified Pilates Teacher (PMA-CPT®), then you know they have more than just a weekend of training.  


If you can’t find a PMA-CPT® at your vacation destination, the next option to research is Pilates teacher training schools. These schools often have a listing of graduates from their programs. You could search to see if someone is in the area where you will be traveling. Though there are a number of schools, here are just a few programs: 


Polestar Pilates

Fletcher Pilates

Stott or Merrithew Pilates


The links above take you to the registries. Simply enter the location where you will be traveling. If there are any graduates from their program in that locale, then a list should be generated. 


Last but not least, you can check with your regular Pilates teacher to see if they have any contacts where you will be vacationing. If not, they might be able to reach out to other colleagues in their network for any recommendations.  


The PMA, Pilates teacher training schools and your Pilates teacher are wonderful resources to help you find a teacher while on vacation. Once you find a few teachers in your vacation spot, it can sometimes be hard to discern which one might be be right for you. Stay tuned to the next newsletter that will cover questions to ask when looking for a Pilates teacher. 

Pilates Day!

Yes, there is a day dedicated to celebrating Pilates!  It is coming up this Saturday, May 4.  Pilates day is an annual, international event, founded by the Pilates Method Alliance (PMA), to raise public awareness about the method through quality classes and events. 


It is inspiring to see people around the world practicing Pilates.  In support of Pilates Day, please enjoy this video the PMA assembled from photos of last year’s events.

Happy Pilates Day…Everyday!!!